Your sump pump is the primary line of defense against plumbing leaks, flooding, heavy rain, and thawing snow. Regular testing is a must to keep it functioning properly. Before you start, always consult the manufacturer’s instructions for your specific model to ensure you’re following the correct procedures.
Let’s walk through the importance of testing your sump pump and how to perform routine checks that will help prevent basement or crawl space flooding and costly water damage.
Why Is Testing Your System Important?
Neglecting to test your sump pump can lead to serious expenses and consequences when you need it to perform the most. Without regular tests, your system could fail, resulting in flooding, property damage, and costly restoration work.
Regular checks ensure the sump pump is ready to handle heavy rain or rising groundwater, giving you peace of mind. Here’s what could happen if you skip testing your sump pump:
- Basement flooding, potentially damaging walls, flooring, and furniture
- Mold growth due to standing water, posing health risks
- Electrical damage from water exposure
- Costly water damage repairs or even foundation issues
Testing your sump pump a few times a year, especially before storm season — which is typically spring and early summer in Minneapolis — helps catch potential issues before they compound.
Testing Your Sump Pump
Regular testing ensures your sump pump is ready to protect your home when heavy rain or flooding occurs. With a few simple steps, you can catch potential issues early and avoid unexpected breakdowns: You don’t want to get stuck with the latter in the event of rising water. Here are two effective ways to test your sump pump and ensure it’s functioning properly.
Method 1: Power Cycle
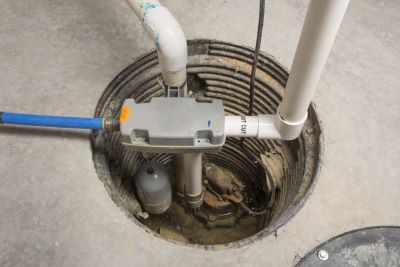
One way to test your sump pump is to perform a power cycle. First, unplug the pump from its power source. You should see two plugs: one for the float switch and one for the motor. Unplug both, then plug in just the pump’s motor. If it doesn’t turn on right away, it may need repair or replacement. If it works, reconnect the float switch plug, and your pump should be good to go.
Method 2: Adding Water
Another method is to simply add water to the sump pit. Slowly pour water into the pit until the float rises and activates the pump. If the pump doesn’t turn on, there’s probably an issue with the float switch. If it does activate, watch to ensure the pump efficiently removes the water; the pit should be left nearly dry. You can also manually lift the float arm to test the switch, but avoid letting the pump run without water for more than a few seconds to prevent a malfunctioning motor.
Schedule With a Professional Plumber in MN
If these sump pump testing methods aren’t delivering satisfactory results, or you’re worried about your pump’s performance, it’s time to call in a professional. At 4Front Energy, we’re fully licensed and insured, providing expert sump pump services throughout Minneapolis and St. Paul. We service all brands and ensure your system is ready to protect your home from potential water damage.
Schedule your sump pump service in the Twin Cities and enjoy peace of mind knowing your home is protected.


